1. What is Shopify Flow?
Shopify Flow is a self-developed automation tool by Shopify designed to help you monitor events occurring in your store and automatically execute corresponding tasks and processes. You can install this tool for free as long as your Shopify store plan is Shopify, Advanced, or Plus. Through the use of triggers, conditions, and actions—three key components—you can automate your workflow. For example, tasks such as automatically labeling orders or checking order amounts can be streamlined using Shopify Flow.
2. What marketing campaigns can be created?
This article will guide you on how to effortlessly create the following three marketing campaigns using Ako Marketing and Shopify Flow, helping boost your store performance:
- Monthly/Weekly Double Points on Member Days
- Double Points on Flash Sale Events
- Double Points on Purchases of Designated Products
-
Custom points-earning actions based on VIP tier.
3. Before you start
✅ Check your subscription plan
This feature is available in our Platinum plan(US$49) and above. Please go to Ako Marketing > Service Plan to make sure your current plan is on Platinum plan or higher. (If you haven't installed Ako Marketing App, click here to install Ako Marketing)
✅ Activate place an order reward
Please go to Ako Marketing > Loyalty Program and ensure you've turned on the "Place an order" reward within the Ways to Earn reward panel.

✅ Install Shopify Flow
Click here to install Shopify flow
4. Create an Automated Doubling Process for Points
Example 1: Monthly/weekly Member Day

Steps:
- In Shopify Flow, click on "Create workflow".
- Click on "Select a trigger" and add "Order paid" as the trigger condition.
- Click on "+" to add an "Action", then choose "Add order tags" to implement automatic labeling. Next, in the "Tags" field, enter the syntax based on the activity cycle:
➊ Syntax for monthly campaign 👉 Date{{ order.createdAt | date: "%d" }}
This syntax will convert the order creation time to a date and add it as an order tag. For example, if the order is placed on 5th, it will automatically label the order with "Date5".

➋ Syntax for weekly campaign 👉 {{ order.createdAt | date: "%a" }}
This syntax will convert the order creation time to the day of the week and add it as an order tag For example, if the order is placed on a Monday, it will automatically label the order with "MON":

-
Add a "Wait" action and set a wait time of "30 seconds".
(This buffer allows Shopify to tag the orders correctly.)

-
Add a condition to filter orders on the day of the event. Click on "Add criteria" → choose "Tags" and input the date tag. (e.g., Date5 or MON) in the "Tags_Item" field→ Set the filter condition to "Includes”.

↪ This screenshot means only orders containing Date5 tag will be included in the execution of workflow.
-
(Optional) Add another "Condition" and select "customer tags" to check if the purchaser has a membership status. Input the membership level tag in the "Tags_item" field. You can find this tag by going to Loyalty Program > VIP and copying the tag you've set for the membership level (=Tag Key).

📌 If you'd like to customize the point reward value based on customer's VIP tier, please create a separate flow for each tier. -
Add an action, click on Installed App Actions, find Ako Marketing in the list, and select "Award points for order placed".


-
In "Multipliers," input the multiplier for the reward points, and in "Reward Expiry," set the expiration period for the points:

↪ Example: A customer who originally earned 2 points for every $1 spent will now receive 6 points for every $1 spent after participating in this activity.
- Save and click on "Turn on workflow" to officially activate it.
Example 2: Flash Sale Points Doubling

↳ The screenshot above is an example of orders placed during the period of September 1st to September 3rd with points doubled.
Steps:
1.In Ako Marketing > Loyalty Program > Ways to Earn Rewards > Confirm that the activity for earning reward points through "Place an order" is enabled:

2.In Shopify Flow, click on "Create workflow".
3.Click on "Select a trigger" and add "Order paid" as the trigger condition.
4.Add a "Condition" to check orders placed during the period of September 1st to September 3rd. Set the condition as "Greater than or equal to 9/1 12:00 AM and Less than or equal to 9/4 12:00 AM" to include orders placed up to 11:59:59 PM on September 3rd in the points rewarding process:

-
Add an "Action," click on Installed App Actions, find Ako Marketing in the list, and select "Award points for order placed"

-
Go to "Multipliers," input the multiplier for the reward points, and in "Reward Expiry" set the expiration period for the points:

↳ Example: a customer who originally earned 2 points for every $1 spent will now receive 4 points for every $1 spent after participating in the Flash Sale.
🚨 If only members can participate in the Flash Sale, please refer to 👉Step 7👈 of Scenario 1 to set up membership qualifications.
- Save and click on "Turn on workflow" to officially activate it.
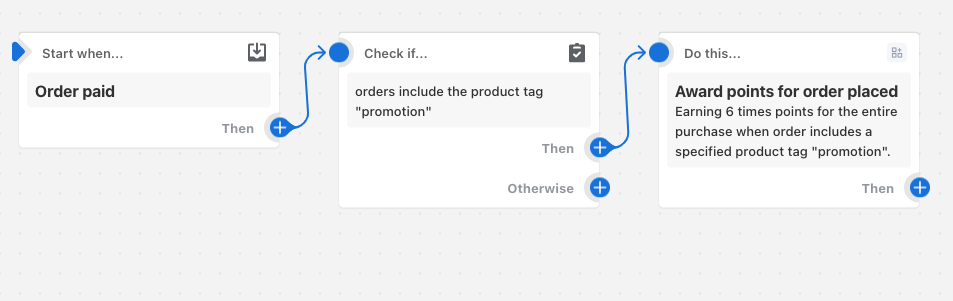
Example 3: Bonus Points for Specific Products
3.1. Purchase specific items for a "Double Reward Points for the Entire Order" promotion.
-
In Ako Marketing > Loyalty Program > Ways to Earn Rewards > Confirm that the "Place an order" reward points activity is enabled.
-
Shopify Flow will use "Product Tags" to check if the order contains the specified items for point rewards. Please check in your Shopify product backend to ensure that the products for your campaign are labeled with the specified tags (see the screenshot below).

- In Shopify Flow, click on "Create workflow" to establish the workflow.
- Click on "Select a trigger" and add "Order paid" as the trigger condition.
- Add a "Condition," choose to check "product tag" and input the specified product tag you created in the "Tags_item" field.
-
Add an "Action," click on Installed App Actions, find Ako Marketing in the list, and select "Award points for order placed".

-
In "Multipliers," input the multiplier for the reward points, and in "Reward Expiry," set the expiration period for the points:

↳ Example: If you originally earn 1 point for every $1 spent, a $1000 order containing specified products can transform from 1000 points to ➜ 1000 * 6, resulting in a total of 6000 points.
- Save and click on "Turn on workflow" to officially activate it.
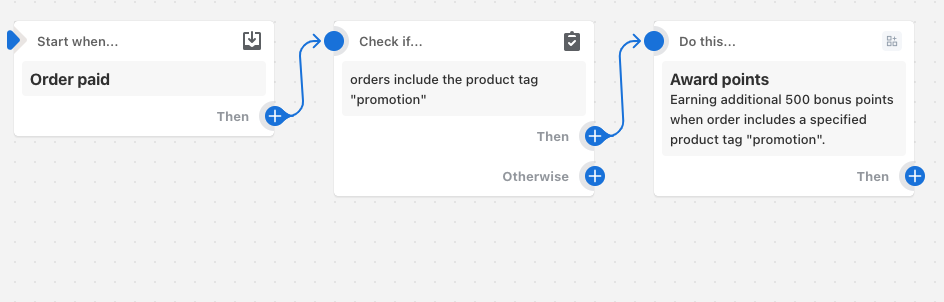
3.2. Purchase specific items for "additional" bonus points.
-
Go to Ako Marketing > Loyalty Program > Ways to Earn Rewards > Confirm that the "Place an order" reward points activity is enabled:

-
The system will use "Product Tags" to check if the order contains the "specified items" for point rewards. Please go to the Shopify product backend and check that the products for your campaign have been labeled with the specified tags (refer to the illustration below).

- In Shopify Flow, click on "Create workflow" to establish the workflow.
- Click on "Select a trigger" and add "Order paid" as the trigger condition.
- Add a "Condition," choose to check "product tag" and input the specified product tag you created in the "Tags_item" field.
-
Add an "Action" click on Installed App Actions, find Ako Marketing in the list, and select "Award points":
7. In "Points Amount" input the quantity of additional points you want to reward, and in "Reward Expiry" set the expiration period for these points.

8. Save and click on "Turn on workflow" to officially activate it.
5. Configure Points Notification Email
- Go to Ako Marketing > Loyalty Program > Programs > Email.
- Refer to this article to set up the template for sending points notification: How to automate email notifications for your loyalty program?

1. What is Shopify Flow?
Shopify Flow is an automation tool designed to help you monitor store events and execute tasks automatically. It is free for stores on the Shopify, Advanced, or Plus plans. By using triggers, conditions, and actions, you can streamline workflows like labeling orders or checking order amounts without manual effort.
2. What marketing campaigns can be created?
Using Ako Marketing and Shopify Flow, you can easily create high-performance campaigns such as:
- Monthly or Weekly Double Points on Member Days
- Double Points during Flash Sale Events
- Bonus Points for specific designated products
- Tier-based custom points-earning actions
3. Before you start
✅ Check your subscription plan: This feature requires the Platinum plan (US$49) or higher. Check your status in Ako Marketing > Service Plan.
✅ Activate "Place an Order" reward: Ensure this is toggled ON in Ako Marketing > Loyalty Program > Ways to Earn.
✅ Install Shopify Flow: Ensure the Shopify Flow app is installed in your store.
4. Create Automated Points Doubling
Example 1: Monthly/Weekly Member Day
Set up a workflow that automatically tags orders based on the date or day of the week, then awards extra points if the tag matches your event day.
Use syntax like Date{{ order.createdAt | date: "%d" }} for monthly campaigns or {{ order.createdAt | date: "%a" }} for weekly events. This allows Shopify to auto-label orders (e.g., "Date5" or "MON") for easy filtering.
Example 2: Flash Sale Points Doubling
Create a time-based condition in Shopify Flow to check if an order was paid between specific dates (e.g., Sept 1st to Sept 3rd) and trigger the "Award points for order placed" action with a higher multiplier.
Example 3: Bonus Points for Specific Products
By using Product Tags, you can trigger bonus rewards only when specific items are purchased. You can choose between doubling the points for the entire order or awarding a fixed amount of additional points for the specific item.
5. Configure Points Notification Email
After setting up your automation, ensure customers are notified. Go to Loyalty Program > Programs > Email to set up the "Points Earned" notification template.
FAQ: Shopify Flow & Points Automation
Do I need a specific Shopify plan to use Shopify Flow?
Shopify Flow is available for free if your store is on the Shopify, Advanced, or Plus plan. If you are on the Basic plan, you may not be able to install the Flow app.
Why do I need to add a "Wait" step in Example 1?
Adding a short "Wait" step (e.g., 30 seconds) allows Shopify enough time to process and apply the order tags before the next condition checks for them. This ensures your automation triggers accurately.
Can I reward different multipliers to different VIP tiers?
Yes! In Shopify Flow, you can add a condition to check for "Customer Tags" (your VIP tier tags). To award different points values, simply create separate workflows for each tier.
How does the multiplier work in the "Award Points" action?
The multiplier increases the base points earned. For example, if a customer normally earns 1 point per $1, a multiplier of 2 will award them 2 points per $1 for that specific transaction.
Ready to automate your loyalty growth? If you need help building your first workflow, reach out to us:
📧 service@akohub.com
📅 Schedule a free 20-minute consultation